Hey I’m back, sorry for the long delay but I got busy with the stuff of life. Now it’s time to talk about beef brisket. This is my favorite meat to smoke and can be the most challenging at times too. The significant factors for smoking this cut are the same with just about everything that goes into the pit. It all comes down to time, temperature, wood, rub and cut of meat. There are a couple of things about brisket that you should know. There are two cuts of brisket; whole brisket and flat cuts. Whole briskets have two groups of meat to it, the flat and the point. The point sits on top of the flat and is separated by a layer of fat. The flat cut is the whole brisket with the point removed. Flats are generally leaner and should not be trimmed at all of any fat before cooking. They are also more expensive. I buy my briskets at SAMS Club and a flat cut can run as much as a dollar a pound more than a whole brisket. Flat cuts require less time to cook and are great if you don’t have a lot of time. Most flat cuts are 4-5lbs. each and require about an hour and fifteen minutes per pound to an hour and thirty minutes a pound cooking time. So a 5lb. flat may take you 7 1/2 hours to cook.
If you want your brisket to be all it can be I urge you to cook a whole brisket. They generally weigh 11-14lbs. so just be prepared to smoke this cut for 14-18 hours. They might require long cooking times but the taste and the juiciness of this cut is well worth the time and effort. Plus you can separate the flat from the point when its done cooking and then make the fabled “burnt ends” from the point. Thats a whole other topic we’ll cover at another time.
So let’s get started. Like I said earlier I buy all my briskets from SAMS Club’s. The thing with barbecue is you take the lesser cuts of meat and turn them into the greatest tasting piece of meat that most people have ever had. So you don’t need to spend an exorbitant amount of money from your gourmet butcher shop (sorry all you meat cutters out there) to get a great tasting end product. I think a whole brisket runs about $2.80/lb. right now and a flat’s about a buck more. When cooking a whole brisket I count on the end weight coming in at about 60% of the uncooked weight, so an 11 lb. brisket will end up with about 6 1/2 lbs. of meat. I then figure about a quarter to a third pound of meat per serving. So a brisket weighing 11 lbs. uncooked, should feed 19 to 24 people. I usually figure on a third of a pound per person and rarely have left overs. Cooking a flat that weighs about 5 lbs. uncooked will usually yield about 80% of meat after cooking. This is because most of the fat has been trimmed off. So I figure a 5 lb. flat will feed 12-16 people.
Ok, so now we’ve determined the size and type of brisket to smoke. It’s time to start the magic. let’s talk a little bit about wood. I love to smoke my brisket with pecan wood. I’m in central Indiana and most people never heard of that. Here, the popular woods are hickory and fruit woods like apple or cherry. I have no problem with these woods in fact when I smoke pork I use any one of them or a combination of all three. I just think for brisket, pecan gives a nice gentle smoke flavor to the beef and thats what I like. Some people use oak and others use mesquite, I think you should find whats locally available to you and figure out what you like and use that. Just make sure it’s hardwood. Wood can be soaked for a half hour to overnight in water and this will provide good smoke flavor without it being to harsh. If you want to try something different soak your wood in beer overnight and you’ll get a smoky sweet taste from it, don’t be afraid to experiment. Make sure you have plenty of wood on hand, ready to go.
Light your fire and apply your wood, start bringing your pit up to temperature (200-225 degrees). If you have a water pan smoker put that in at the same time. Don’t miss this opportunity to put more flavor into your meat. I always flavor my water. Usually I’ll take put in four cans of beer and fill the rest of the pan with water. Some people use juice, it’s your choice but it does make a difference.
While the pit is coming up to temperature it’s time to get the rub on the meat. Put the brisket on a sheet pan and pour a little Dr. Pepper, root beer, juice or worcestershire sauce on the meat and rub it in. Next apply your rub to the meat and rub it in so a nice paste starts to form on the meat. Now lets talk about rubs. Some people go simple and pure and apply only salt and pepper. Sorry I’m not one of them. To me, a rub should have a fair amount of sugar in it and spices that you like. I like rubs with white sugar in them as brown sugar tends to burn easier (you know that brown sugar is white sugar with molasses in it right, the molasses in it is what scorches so easy). I’ve made my own rubs many times. A simple rub thats good and you can make at home is Lawrys Seasoned Salt and sugar. There’s a guy out of Houston that makes rubs and sells them on the internet. His name is Bill Cannon and the name of his company is Texas BBQ Rub, look him up on the internet and you can buy it from him. Like I said I’ve made my own and tried all different ingredients but any more I buy his. My favorite is his Grand Champion recipe and you can’t go wrong. I put on plenty of Grand Champion and then add some Montreal Steak Seasoning (it has big bold pepper flavors with the right amount of garlic) then rub it in. So let’s get back to application, make sure you rub in some soda or juice and then message in your rub so it forms a light paste. This is important because, after some time on the smoker, the sugar will begin to caramelize and form a crust on your meat that locks in the juices and turns into what we call a bark. This process is very important to having a great tasting end product! When placing your meat on the smoker, put it on the grate fat side down or towards the fire. This sounds very contrary to what you would think and it took me a couple of years to override my instincts, but it’s all part of getting the juiciest piece of meat possible. The brisket is a very well marbled cut with a good amount of fat surrounding one side of it. If you put it fat side up the bottom gets exposed to the most heat and can actually dry it out and make it tough. if you put it fat side down, the fat protects the meat from over heating and drying out and the rub that you applied will caramelize on the top and keep it moist and delicious! I guaranty it!
Once the meat is prepared and the pit is up to temperature get the meat on and relax, this is what barbecuing is all about! just keep an eye on the temperature (again keep it between 200 and 225 degrees) and make sure you have smoke coming out of your stack. Resist opening the door and checking on things, if you’re the nervous type then add a thermometer to your smoker and put a remote probe in your meat and keep tabs of it like that. Again relax and enjoy the day. The smoke and the low heat are going to do all the work.
Now lets talk about the cooking process and when to take the meat off. When cooking a flat cut, I like to apply smoke to it directly for 2/3 of the cooking time, then double wrap it in tin foil and let it finish out wrapped. The natural question is why would I do that? Well, with the flat cut they trim so much of the fat off, that the meat has less protection from drying out. After about 4 hours its taken all the smoke flavor its going to anyway so its not going to hurt it. What I do is put enough heavy duty tin foul down and put the flat in fat side up this time and wrap it tightly, then put it over more wrap and wrap it again. This second wrap protects it from tearing when or if it sticks to the grates on the smoker and losing all your juice. I don’t always wrap whole briskets because they tend to have more fat on them and protect it better. That being said if you don’t wrap it you can’t collect all those wonderful juices that start coming out at 165 degrees. What happens at 165 degrees is the collagen (that brisket is absolutely full of) starts to break down. You want this to be a slow process so much of it stays with the brisket. When that collagen is all broken down the meat temp should be at about 210 degrees and is ready to come off the pit. A remote thermometer inserted into the brisket when I wrap it tells me everything I need to know about when I take it off. Purest pit masters wont wrap their meat and they usually serve it within an hour or so after it comes off the pit and it stays very moist and juicy. Personally I don’t do so well staying up all night watching the pit and then serving everyone at 4:00 in the afternoon. I’m just too old for all nighters any more. So what I do is smoke the meat the day before the party and slice it cold the day of (it slices so much easier cold) and then put it in a foil pan and reheat slowly. When you wrap your meat and all that collagen melts out you have this wonderful natural gelatin that you put in with the meat after it’s sliced and placed in the foil pan. I also shave off the top layer of fat (that’s left on the meat) and lay it over the top of the sliced meat to add moisture when reheating. The only drawback to this method is that I sometimes lose my smoke ring on the meat, so it doesn’t look as cool, but it does taste great! For those of you that don’t know what a smoke ring is, it’s a red ring that surrounds the outside of your meat as it smokes. This occurs in the smoking process when nitric acids build up on the outside crust (bark) of the meat. The nitric acids come from the burning if the wood as it gives off nitrogen dioxide and interacts with the moisture in the meat itself. Some people will put a little Morton’s Tender Quick on their meat (its full of nitric dioxide) and that will give you a ring too.
So now your brisket is reading 210 -220 degrees and it’s time to remove it from the pit. I have a pair of BBQ gloves (available at texasbbqrub.com for about $10.00) that I use to lift the brisket out of the pit with. If you use utensils they will most likely rip your foil and there goes all the juice you wanted to save, so if anything, use oven mitts. Transfer it from the pit to a baking sheet and let it stand for no less than an hour without unwrapping. It will still be plenty hot don’t worry. Once the rest time of an hour or more passes, carefully open the foil wrap (it still may have hot steam in it so be careful) and remove the meat to a cutting board, fat side up. Reserve the juices, they can be used to pour over the sliced brisket, put in soup, put in your barbecue sauce or used in your beans or you can just do shots of it! Look at the brisket and gently run your knife over the top of the flat and remove the point end. The point can be chopped up for serving or saved for burnt ends. It’s very important to slice the brisket perpendicular to the grain of the meat. If you look at the flat it’s kind of shaped like the state of Indiana. the grain will all run to the pointy end of the brisket, start there and slice it perpendicular to the grain. You can also find the direction of the grain by looking at the underside of the brisket and look for the grain. This will give you nice tender slices of heaven. If the brisket is cooked correctly you should be able to hold a slice up and gently pull it apart where it yields with little pressure but doesn’t fall apart.
Thats it! some people pour their favorite BBQ over the slices, some serve the sauce on the side. Im a sauce on the side guy, I really don’t like sauce on mine at all, maybe a little of the juices from the foil. Enjoy this with your favorite potato salad, corn casserole, baked beans or whatever you want. Some like to serve it as sandwiches and some without bread. Try it any way you want!
Stick to the significant factors and you can make brisket the Texans would enjoy!
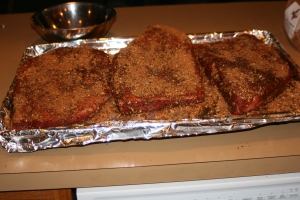
All rubbed up and ready to go!

210 degrees, perfect.

Flats ready to wrap.

Flats all wrapped up.

Ready for slicing. Start at the far end and slice against the grain.

Point and fat cap all trimmed off and sliced up. Yum!
![image[2]](https://turbocue.files.wordpress.com/2013/09/image2.jpeg)


